The habits that keep private access working, and the checklist for when it stops
Everything is set up and it works. This last article is about the unglamorous half: the order you do things in every day, the outside-in checklist that finds a fault in four moves instead of forty, what to do before and after an update, and the short note that means the next person to touch this — possibly you, a year from now — is not starting from nothing.
Tailscale first, Home Assistant second
The single habit that saves the most time is doing things in a fixed order. Every time, on every device:
- Open Tailscale on the device you are holding. Not Home Assistant. Tailscale.
- Confirm it is connected, and connected under the right account. A device can be signed in and idle, or signed in to the wrong account entirely.
- Then open Home Assistant.
It looks like fussiness until the first time something fails. Because you checked the network path a moment ago, you already know it was fine — which removes half the possible causes before you start looking.
The other half of the habit is a piece of restraint: if Home Assistant's local URL stops working, that does not mean Tailscale has failed. They are two separate things and they fail separately. Check them separately.
Knowing which layer you are looking at
Three words get used interchangeably in forum posts and they are not the same thing. Sorting them out now is what stops you clicking in the wrong place later.
- A tailnet is your private Tailscale network.
- A machine is one device that has joined it.
- The Home Assistant app is the Tailscale service managed by Supervisor, which you open and configure from the Apps page in Home Assistant.
Think of a street and a house. The tailnet is the street, and the admin console is the council that decides who is allowed onto it. Your Home Assistant machine is a house on that street. Your Home Assistant login is the front door key. Somebody standing outside cannot tell whether the street is closed or the key is wrong — but the two are fixed in completely different places, by completely different people.
| Layer | What it handles | How you check it |
|---|---|---|
| Tailscale admin console | Accounts, Machines, routes and policy | Home Assistant appears in the Machines list, with its last-seen status and its feature badges |
| The Tailscale app in HA | Runs Tailscale on the Home Assistant host | Status healthy, no blocking errors in the log |
| Home Assistant itself | Login, dashboard and admin rights | You log in normally with a personal account |
flowchart LR
  A["Your phone or laptop"] --> B["Tailscale client
signed in to your tailnet"]
  B --> C["The private path between the two machines"]
  C --> D["Your Home Assistant host,
joined to the tailnet as a machine"]
  D --> E["The Tailscale app,
managed by Supervisor"]
  E --> F["Home Assistant login,
your own account and password"]
  G["Tailscale admin console"] -.->|"accounts, machines, routes, policy"| C
That dotted line is why a working setup can stop working with nothing on your side having changed: policy was edited, a machine was removed, or a route approval was withdrawn.
Work from the outside in
Before you touch anything, record where you are starting from. In the Home Assistant left-hand menu go to Settings → Apps and find Tailscale — if your screen still uses the old name, it will say Add-ons. Note whether it is running. One line, written before you change a setting, is what later tells you whether a change helped or made things worse.
Then, when you cannot reach Home Assistant, resist the urge to start with Home Assistant. Rule things out from the outside in, in this order, and stop at the first one that fails.
- Is this device's Tailscale client connected, and to the right tailnet?
- Is Home Assistant still in the Machines list?
- Is the app running, and what does its log say?
- Only now: Home Assistant's own account, URL, Serve or route settings.
Nobody starts by rewiring a light fitting when a lamp will not come on. You look at the switch, then the fuse, then whether the whole street is dark. Outside in. Each check is quicker than the one after it, and each one you pass removes a whole category of causes.
flowchart TD
  A["You cannot reach Home Assistant"] --> B{"Is this device's Tailscale client
connected, and to the right account?"}
  B -->|"no"| B1["Sign in again on this device.
Stop here. Nothing else is proven broken yet"]
  B -->|"yes"| C{"Does Home Assistant still appear
in the Machines list?"}
  C -->|"no"| C1["Finish the sign-in from the app Web UI,
then read the app log.
Do not reinstall repeatedly"]
  C -->|"yes"| D{"Is the app running, with no
blocking errors in its log?"}
  D -->|"no"| D1["Deal with what the log names
before changing anything else"]
  D -->|"yes"| E{"Is it the LAN behind Home Assistant
that you cannot reach?"}
  E -->|"yes"| E1["Go to the subnet route approval"]
  E -->|"no"| F["The network path is healthy.
Look at the Home Assistant
account and URL"]
Check two is worth more than a glance. Open the Machines page in the Tailscale admin console and confirm the machine that corresponds to Home Assistant — three details, in this order:
- That the machine is there, and that it is the right one. Names are chosen by people, so more than one entry can look plausible. Match it against what you wrote down when you set the machine up.
- Its last-seen status. A machine that was last seen days ago is telling you something quite different from one seen a minute ago. If the timestamp is old, the fault is at the Home Assistant end, and you can stop testing from your phone.
- Its feature badges. These are the labels the console puts on a machine to show what it has been allowed to do, not merely that it exists. Read them against what you meant to set up. A badge you were not expecting is worth understanding before you carry on.
Five faults account for most of what actually goes wrong, and each maps to one rung of that ladder:
- You cannot find Apps at all. The path is
Settings → Apps. If it is not there, confirm whether your Home Assistant install is managed by Supervisor. Container and Core installs cannot follow the app path this guide uses. If your screen still says Add-ons rather than Apps, that is a naming difference between versions, not a different thing. - Home Assistant is not in Machines. Go back to the app's Web UI and complete the login, then read the app log. Reinstalling over and over does not help, because the sign-in is the step that was never finished.
- Machines shows Home Assistant, but Home Assistant will not open. First confirm the client you are holding is logged in to the same tailnet. Then check the Home Assistant login account and the URL you are using.
- The route seems to exist but the LAN is unreachable. Confirm the route has been approved in route settings on the Machines page. Then test with the correct range, against a target you are authorized to reach. This is the next section.
- Things got uncertain after a change. Go back to the last known-good state, keep the logs and the change record, then change one thing at a time.
Pending approval is a checkpoint, not a fault
If you set up a subnet router in Part 5, this is the one failure that reads like a bug and is not. The app on your Home Assistant host can offer to carry traffic for a range of your home network. The tailnet will not act on that offer until an administrator approves it, in the admin console, under that machine's route settings. Until then, the subnet is shown as still waiting for approval.
It is a delivery driver who has the right address and is standing at the door of the building. Nothing has gone wrong. Somebody inside still has to press the buzzer, and until they do, the parcel does not come in.
flowchart LR
  A["The app advertises one subnet"] --> B["The subnet is listed
as awaiting approval"]
  B --> C{"An administrator approves it
in the admin console, under
that machine's route settings"}
  C -->|"not yet"| D["Tailnet devices cannot reach that range.
The checkpoint is doing its job"]
  C -->|"approved"| E["Tailnet devices can reach
the approved range"]
  E --> F["Retest from another network,
against a target you are
authorized to reach"]
The page below is where you read that state from inside Home Assistant. Note what it is: the Subnet router page of the Tailscale app, not the admin console. The approval itself happens elsewhere, on the Machines page in the admin console — there is no capture of that screen here, so go by what your own console shows you.
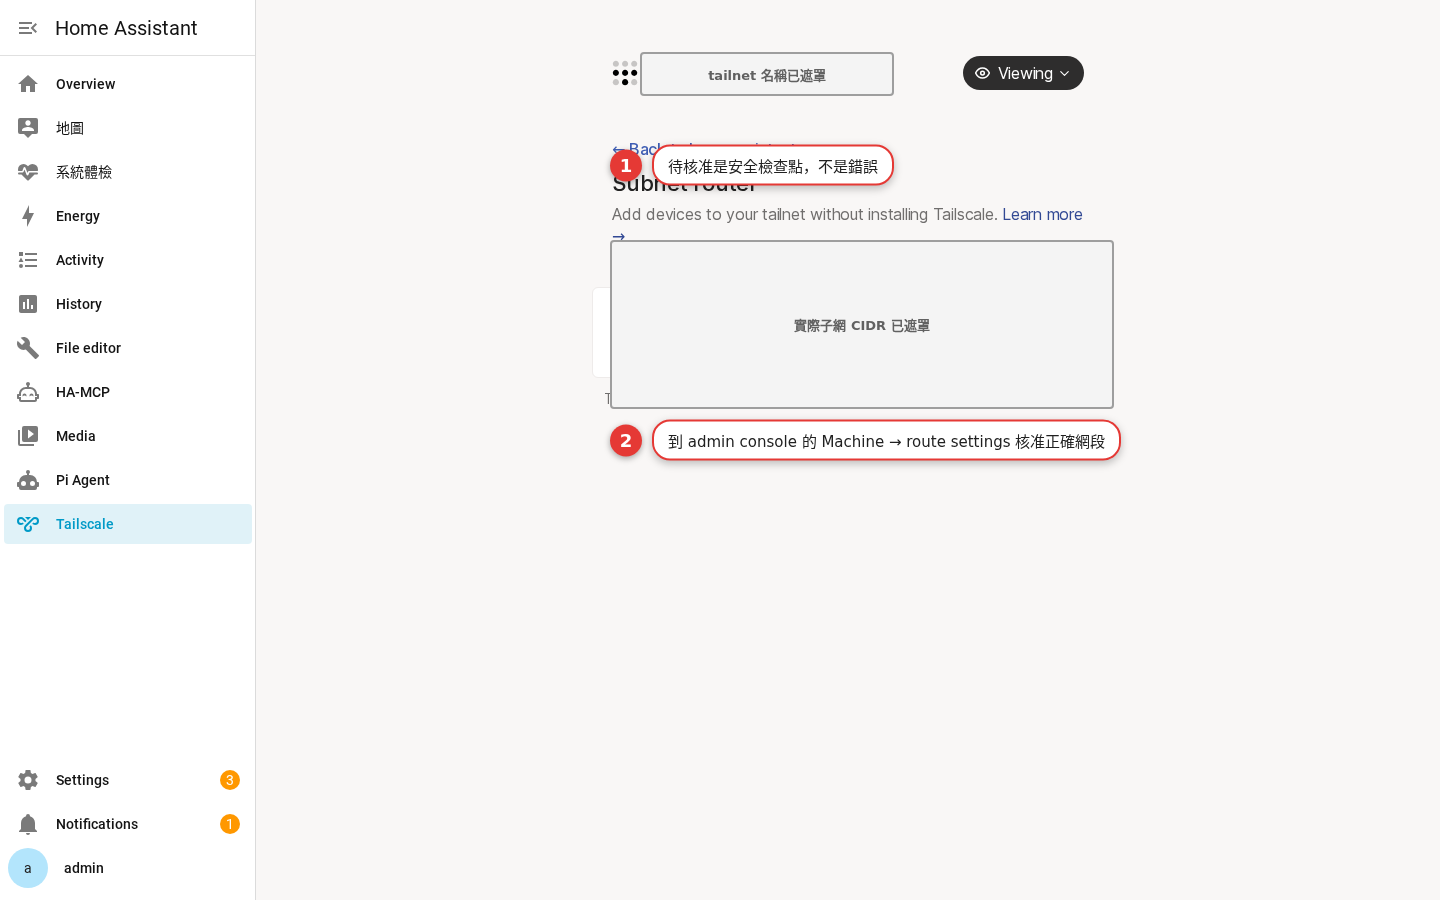
- Tailscale is highlighted in the sidebar. That is how you know you are inside the Home Assistant app rather than on a Tailscale website — the whole Home Assistant menu is still there beside it.
- Subnet router is the heading, with the line about adding devices to your tailnet without installing Tailscale underneath it. That single sentence is the entire purpose of the feature.
- The two large grey boxes are redactions, not empty fields. On your own screen these carry your tailnet name and the subnet range being advertised. Yours will show real values, and two rules follow from that: do not copy the names or IPs in the screenshots as your own values — the ones in any guide, including this one, belong to somebody else's network and will not work on yours — and do not paste your own values into a forum post.
- The Chinese annotations added on top of the capture make the two points this section is about: that waiting for approval is a security checkpoint rather than an error, and that the approval is done in the admin console under the machine's route settings.
- Viewing, top right, is a dropdown. Nothing on this page approves anything — you are reading state here, not granting it.
One habit goes with this: advertise one range with a clear purpose, and only that one. Not every network at once. When you write the range down — and here it is only a placeholder, since your own value is yours — it looks like 192.168.1.0/24. Take an inventory before you advertise a second one.
Updating without losing your way in
Updates are the most common reason a working setup stops working, mostly because they arrive on a day you were not thinking about remote access. Three things make them uneventful.
Before
Read the release notes, and create a Home Assistant backup. The backup is the difference between an inconvenient evening and a lost one. Do both before you press update, not after something looks wrong.
After
Run a real test from a device on the tailnet, on a different network. Not from the sofa on your home wi-fi — that path may work for reasons that have nothing to do with Tailscale.
If you touched routes or policy
Go back to the Machines page and the policy editor and re-check the approvals and the scope. An update is a good moment to confirm that what is approved is still what you meant to approve.
Do that test the same way every time:
-
Test 1
On your home network
Open Home Assistant on your local network and confirm that the accounts and the dashboard were not affected by whatever you just changed. This is the control, not the test.
-
Test 2
On a different network
Switch a test phone to mobile data or another secure network. Confirm Tailscale is connected. Then open Home Assistant once. If the change involved routes, test only against targets you are authorized to manage.
-
Test 3
Write down the result
Success or failure, which device, what time. Six months later, this note is worth more than the memory of “it used to work.”
-
Test 4
Stop at the security boundary
Do not turn on something extra while you are already in there. Exit nodes, DNS override and public Funnel are outside what this guide covers. Leave them disabled unless you have a reason you can state out loud.
The same restraint applies to anything you add later. Start with the smallest workable setup and expand one step at a time. If all you want is to see your dashboard while you are away from home, private access over the tailnet is usually easier to control than a public entry point. If you do need a LAN subnet, list one subnet with a clear purpose first, and do not advertise every network at once.
| What you need | Where to start | Not yet |
|---|---|---|
| See Home Assistant while away | Private access from a device logged in to the tailnet | Open ports, and public sharing you do not need |
| Manage devices | The Machines list, with personal accounts | A shared admin login everyone uses |
| Reach your home LAN | A single approved subnet route | Advertising several subnets before taking inventory |
Permissions follow the same shape. Only the people who need to reach Home Assistant get a path to it, and only the people who need to manage the tailnet get admin console access. Those are two different lists, and they should stay two different lists.
Before you call any of this finished, three security checks. They take about a minute between them:
- The account logged in to Tailscale is the right one. On the device in your hand and on the Home Assistant host. Signed in is not the same as signed in to the tailnet you meant.
- Home Assistant is still managed with separate personal accounts. One account per person, with the admin rights each person actually needs. Nothing you did on the network side should have quietly turned that into a single shared login.
- The Machines list has no unknown or retired devices. Anything you cannot name, and anything belonging to a phone or laptop that is no longer in service, comes off the list.
The note that makes this survivable
The biggest risk with network settings is not that they are wrong. It is that they worked at the time and nobody remembers why. When you finish a change, write down the date, who did it, the purpose, the state before and after, and the device you verified with — in your password manager, or in your site maintenance notes.
It does not need to be long:
Notice what is not in either sentence: no address, no domain, no CIDR, no credentials. The record exists to explain a decision, not to store a secret. Secrets belong in a controlled secrets manager.
| Write this down | Keep it out of public docs | Who needs it next |
|---|---|---|
| Purpose of the change, date, verification result | Credentials, auth keys, login URLs | The Home Assistant maintainer |
| Each machine's purpose and its owner's role | The full tailnet domain and private IP addresses | The Tailscale admin |
| Which subnet, with a clear purpose, was approved | Unredacted CIDRs, scan results, street addresses | The network maintainer |
The record earns its keep on the bad days. A phone is lost, a router is replaced, the app is updated, or admin rights change hands — and the question becomes which layer to roll back. That is also the moment to go through the Machines list and confirm there is nothing unknown or retired sitting in it. When a device leaves for good, revoke it there; the record is what tells you which entry was which.
Do I need to open a port on my router?
Does Tailscale replace the Home Assistant login?
My screen says Add-on, not App. Is that a problem?
Can I set up an exit node or DNS override while I am here?
The specific pages behind this part:
Where to go from here
You have private remote access, and a way to keep it.
The full guide keeps every chapter in one place, along with the official Home Assistant and Tailscale documentation each part was built from.
Open the full guidePart 6 of the Home Assistant Tailscale Remote Access Guide series on the Apporo blog.
Adapted from the Home Assistant Tailscale Remote Access Guide, produced by WoowTech and released under CC BY 4.0. This adaptation is published by Apporo under the same licence.
Light · Air · Water · Control · apporo