Let the tailnet reach the devices that will never run Tailscale
Everything so far has been about reaching Home Assistant itself, and for that you need nothing in this article. A subnet router is for the rest of the house — the printer, the old NAS, the settings page on your switch — hardware that will never have Tailscale installed on it. This article covers whether that is worth doing at all, how to advertise exactly one subnet, and why the route then sits there marked as waiting until an administrator says yes. The rule that has governed every part of this guide still governs this one: keep access private first, and never expose Home Assistant directly to the internet.
Most people reading this do not need a subnet router
That is the honest first answer, and worth taking seriously before you change any settings. You need a subnet router in exactly one situation: you want to reach, from a device on your tailnet, something on your home network that does not have Tailscale installed on it. If all you want is to open your Home Assistant dashboard while you are out, the earlier parts of this guide already did that.
Every device you install Tailscale on gets its own front door onto the private network. Your printer, the NAS you bought in 2016 and the camera with the fixed firmware are never going to get one. A subnet router is one machine on that street agreeing to answer the door on behalf of the neighbors and carry the parcel down the hall. It is useful. It is also one machine now handling other people's post, which is why the rest of this article is about keeping that job small.
That decision has a shape:
flowchart TD
  A["What do you actually want to
reach from outside the house?"] --> B{"Does that device itself
run Tailscale?"}
  B -->|"yes, such as Home Assistant"| C["No subnet router needed.
The earlier parts already cover it"]
  B -->|"no, and it never will"| D{"Is it a device you are
authorized to manage?"}
  D -->|"no, someone else's NAS,
a camera, a resident's device"| E["Stop here. It is not
yours to route to"]
  D -->|"yes"| F["A subnet router is the right tool.
Advertise one subnet, with a purpose"]
If you have landed on the path that does need one, start with the smallest workable setup and expand from there. If all you want is to see your dashboard while you are away from home, private access over the tailnet is usually easier to control than a public entry point. If you genuinely need a LAN subnet, list one subnet with a purpose you can state in a sentence, and do not advertise every network at once.
| What you need | Where to start | Not yet |
|---|---|---|
| View Home Assistant remotely | Private access from a device signed in to the tailnet | Open ports and unnecessary public sharing |
| Manage devices | The Machines list and separate personal accounts | A shared admin login |
| Reach your home LAN | A single approved subnet route | Advertising several subnets without taking inventory first |
Three layers, and knowing which one you are clicking in
More people get lost here than get lost in the settings. Three separate things are involved, their vocabulary overlaps, and the step that makes a route usable happens in a different one from the step that creates it.
| Layer | What it handles | How you verify it here |
|---|---|---|
| Tailscale admin console | Accounts, the Machines list, routes and policy | Home Assistant appears in Machines |
| The Tailscale app in HA | Runs Tailscale on the Home Assistant host | Status healthy, no blocking errors in the log |
| Home Assistant | Login, dashboard and admin rights | You log in normally with a personal account |
Two naming notes, because both cause a wrong click. First, the tailnet is your private Tailscale network and a machine is one device that has joined it — the Machines list is a list of joined devices, not a list of routes. Second, the Tailscale service inside Home Assistant is reached from Settings → Apps; if your version of the interface still uses the older name, that same page says Add-ons. Recognize the thing rather than the label: Info, Configuration, Log and Web UI are the four places you will use.
Here is what a request looks like once all of this works:
flowchart LR
  A["Your phone, away from home,
signed in to the tailnet"] --> B["Encrypted tailnet path.
No router port opened"]
  B --> C["The Home Assistant host,
running the Tailscale app"]
  C --> D{"Is the destination inside
the one approved subnet?"}
  D -->|"yes"| E["Forwarded onto your home LAN"]
  D -->|"no"| F["Not forwarded"]
  E --> G["The printer or NAS answers.
It never knew Tailscale existed"]
Notice the last box. The device on your LAN is unchanged and unaware. That is the appeal, and also the reason to keep the range narrow — the devices behind it did not opt in.
Advertise exactly the one subnet you need
The app docs define advertise_routes as advertising to the tailnet the subnets this host can reach. Advertising is a claim the host makes about itself; nothing has been granted yet.
A CIDR is just a compact way of writing “this whole street” instead of listing every house number on it. The number after the slash says how much of the street you mean. Getting it wrong does not usually produce an error message — it produces a range that is quietly bigger than you intended.
Before you start, record the current state. Open Settings → Apps, find Tailscale, note whether it is running, and leave alone any advanced option you are not currently using. If you have to roll back later, this note is what you roll back to.
-
Step 1
Find the actual CIDR from your own router
Look it up in your router's interface or in your own network documentation. This is the one value in the whole procedure that nobody can give you.
The format looks like this:
192.168.1.0/24That is a placeholder showing the shape only. It is not a value to copy. Confirm your router's actual subnet before you type anything into the configuration.
-
Step 2
Narrow advertise_routes to that single CIDR
Open the Configuration tab of the Tailscale app and set
advertise_routesto that one range. There is also alocal_subnetsoption, which the app docs describe as advertising the local subnets on supported interfaces. When you are in any doubt about which to use, choose the one that does not widen the scope. -
Step 3
Save, restart the app, and look for the waiting state
Save the configuration and restart the app. Then go back to the Tailscale Web UI, or to Machines in the admin console, and confirm that the Subnets badge or a notice about pending approval has appeared. Seeing that notice is the step succeeding, not failing.
-
Step 4
Get the test device ready
You will test from a different device that is signed in to the same tailnet. Linux clients usually have to be told explicitly to accept subnet routes — the Tailscale docs describe running
sudo tailscale set --accept-routeson that machine. Read the official docs for whichever platform you are testing from first, and do not start changing routing on a host you do not understand.
Advertised is not approved
Your app is now telling the tailnet it can reach a subnet, and other devices still cannot use it. People read that as a fault and go looking for what broke. Nothing broke. Tailscale's own subnet router guide requires a separate approval step, performed by an administrator, and until that has happened other tailnet devices should not assume the route is usable.
It is the difference between a builder telling you he can get into the whole basement and you deciding which room he gets a key to. The first is something he says about himself. The second is a decision you make, in a different place, on purpose. A subnet route waiting for approval is a builder standing at the door with no key yet.
The Tailscale page inside Home Assistant is where you confirm the first half happened.
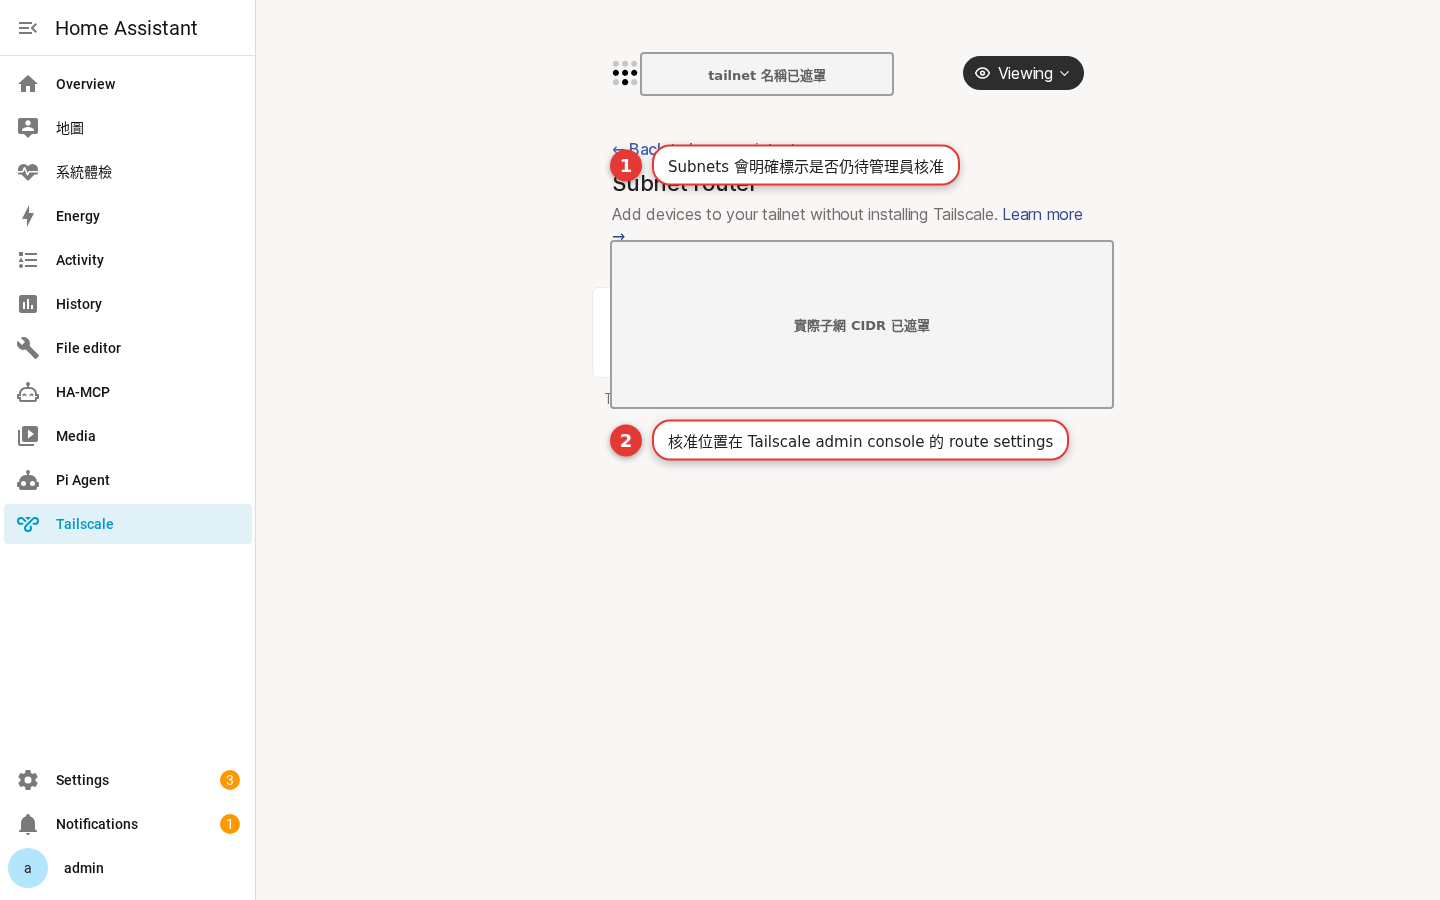
- Tailscale is highlighted in the Home Assistant sidebar. That is the single most useful thing on the screen: you are in Home Assistant. Nothing you click on this page approves a route.
- The tailnet name at the top is behind a gray mask. Your own screen shows the real name there. Treat it the way this capture does — masked — whenever you share a screenshot.
- Subnet router is the heading, and the line under it, Add devices to your tailnet without installing Tailscale, is the entire purpose of the feature in one sentence.
- The large gray panel is where the advertised range and its state would be listed. It is masked here, so this capture cannot show you what a pending badge looks like. On your own screen this is the panel to read.
- Viewing, top right, is the app's own dropdown. It is not the approval control either.
- The red numbered boxes are annotations the guide's author drew on top of the screen, written in Chinese. They point at where the waiting state is shown, and note that the approval itself is done in route settings in the admin console — which is the next section, and a different browser tab.
Approving it, and getting the client to take the route
This half happens in the Tailscale admin console, with an administrator account, in an ordinary browser tab. It is not part of Home Assistant, and no screenshot in this guide shows it — so read these as steps rather than looking for a picture to match.
-
Step 1
Confirm the app really advertised the route
Go back to the previous section first. The Tailscale app must have saved the correct
advertise_routesvalue and finished restarting. Approving a route that was never advertised is the most common way to spend twenty minutes on nothing. -
Step 2
Find Home Assistant in Machines
With an admin account, go to the admin console, open Machines, and find the machine that corresponds to your Home Assistant host — the one whose purpose you can actually name. Two things on that row are worth reading before you touch anything: its last-seen status, which tells you whether you are looking at a live machine or a stale entry, and its feature badges, the Subnets badge among them. While you are there, read the list for unknown or retired devices rather than scrolling past it.
-
Step 3
Open Edit route settings and approve only your range
From that machine's menu, choose Edit route settings, select the IP range you meant to approve this time, and save.
Do not approve other pending routes while you happen to be on the screen. Anything else waiting there is either something you have not thought about yet or something you did not put there — and both of those deserve their own decision.
-
Step 4
Have the test device accept routes
On a Linux client, run
sudo tailscale set --accept-routeswhen the official docs call for it. This is a setting on the device doing the testing. It does not turn Home Assistant into an exit node and it changes nothing about your tailnet. -
Step 5
Run one minimal end-to-end test
Test an authorized LAN address with a known purpose at the IP level first, then the service running on it. On success, record what you did. On failure, re-check the advertised route, the approval, whether the client is accepting routes, and your access policy — one at a time.
Step 4 is the one people skip. A new road appearing on the map does not put it into your car's satnav. The route can be advertised at your house and approved by the administrator and the laptop in your hand still will not use it, because nobody told the laptop to look.
The four states, and the two places they stall:
flowchart TD
  A["Configuration saved and
the app restarted"] --> B["State 1 — advertised.
The host claims it can reach the subnet"]
  B --> C{"Has an administrator
approved it?"}
  C -->|"not yet — this is
the checkpoint"| D["Other devices should not
assume the route works"]
  D --> E["Admin console, then Machines,
then Edit route settings,
then select that one range"]
  E --> F["State 2 — approved"]
  C -->|"yes"| F
  F --> G{"Is the testing device
accepting subnet routes?"}
  G -->|"no — common on Linux clients"| H["Run the accept-routes command
on that device"]
  H --> I["State 3 — accepted by the client"]
  G -->|"yes"| I
  I --> J["State 4 — the LAN device answers"]
Three things to confirm before you close the admin console tab:
- The account signed in to Tailscale is the right one. It is easy to be holding a personal account when you meant to be using the admin account, or the other way round, and the approval you just granted was granted by whichever one you were actually signed in as.
- Home Assistant is still managed with separate personal accounts. Nothing in this article changes that, and nothing should. The Tailscale account and the Home Assistant account are two different credentials on purpose.
- The Machines list has no unknown or retired devices. Every entry should be a device you can name and a person you can name. Anything else comes off the list.
Two networks, then a record somebody else can read
Test on both sides of your own front door. A change that works only from your sofa has not been tested.
-
Test 1
On your home network
Open Home Assistant on your local LAN and confirm that the accounts and the dashboard were not affected by anything you changed. This is the check for damage, not the check for the new capability.
-
Test 2
On a different network
Switch the test phone to mobile data or another network you trust, confirm Tailscale is connected, and open Home Assistant once. Then, and only then, try the LAN target — and only a target you are authorized to manage.
-
Test 3
Record the outcome either way
Note whether it worked, which device you used, and the time. That is far more use later than remembering “it used to work.”
-
Test 4
Stop at the boundary
Exit nodes, DNS override and public Funnel setup are outside this guide. Having got a subnet route working is not a reason to carry on into them the same evening.
The biggest risk with network settings is not that they break. It is that they work, and a year later nobody remembers why. When you finish, write down the date, who did it, the purpose, the state before and after, and the device you verified with — in your password manager or your site maintenance notes.
A usable record reads something like this: “2026-08-19, the administrator confirmed the Home Assistant machine is still in the designated tailnet; private access tested successfully from a managed laptop on a non-home network.” For a subnet router, add a line saying that only a single approved LAN CIDR is advertised and that it was approved in the admin console.
| Record this | Keep out of public documents | Who needs it next |
|---|---|---|
| Purpose of the change, date, verification result | Credentials, auth keys, login URLs | The Home Assistant maintainer |
| Each machine's purpose and its owner's role | The full tailnet domain and private IP addresses | The Tailscale admin |
| Which subnet, with a clear purpose, was approved | Unredacted CIDRs, scan results, street addresses | The network maintainer |
Check these, in this order
- There is no Apps entry at all. Confirm whether your Home Assistant install is managed by Supervisor. A Container or Core install cannot follow the app path in this guide — nothing is wrong with it, it is a different shape of installation.
- Home Assistant is not in Machines. Go back to the app's Web UI and finish the login, then read the app's log. Reinstalling repeatedly does not fix a login that was never completed.
- Machines shows it, but Home Assistant will not open. First confirm the client is signed in to the same tailnet, then check the Home Assistant account and the URL you are using. That is a login problem wearing a network problem's clothes.
- The route seems to exist but the LAN is unreachable. Confirm the route was actually approved in route settings on the Machines page, confirm the test device is accepting routes, and then test with the correct CIDR against a target you are authorized to reach.
- Things got uncertain after a change. Return to the last known-good state, keep the logs and the change record, and then change one thing at a time.
Do I have to open a port on my router for this?
Does Tailscale replace the Home Assistant login?
My screen says Add-on, not App
Can I set up an exit node or DNS override while I am in here?
Can I advertise several subnets at once and sort it out later?
A device left the household. What do I do?
Where to go from here
The route works. Now make it survive normal life.
Part 6 is the maintenance half: how phones and laptops should be set up for day-to-day use, what to check when something stops working, how to handle updates, and the handover checklist for whoever looks after this after you.
Open the full guidePart 5 of the Home Assistant Tailscale Remote Access Guide series on the Apporo blog.
Adapted from the Home Assistant Tailscale Remote Access Guide, produced by WoowTech and released under CC BY 4.0. This adaptation is published by Apporo under the same licence.
Light · Air · Water · Control · apporo